Only got a few pics of the job finished:


Only got a few pics of the job finished:
Currently working on a race car, car had been stripped.


Only fitting bear essentials for the dash. Center dash-controls and power destitution fabricated.

Have to make a full car loom and engine management loom.
Also had to repair a little crash damage.

All photos posted on my Flickr: Here
Print from Mac OSX to Printer on Windows Network
My setup
Brother HL5040 Connected to a Windows 7 64 Machine using USB
Lynksys Router
Mac 20″iMac Running Snow Leopard and an old 17″ iMac G5 running Leopard
On the Windows 7 PC, Enable LPD drivers
1. In Windows 7 Control Panel
2. Select Programs
3. Select “Programs and Features” pane
4. On the LH Side Click “Turn Windows Features on or off”
5. Open the Print and Document Services Menu and “Turn on the LPD print Service”.
On the Windows 7 PC, Share the printer
1. Select the “Start/Devices & Printers
2. Right click the printer and select “Printer Properties”
3. Click the Sharing tab.
4. Enable the checkbox “Share this printer”
5. Make sure the printer name has no spaces and simple, e.g. this is mine – lh5040
6. Also a good idea to specify the ip address of the machine connected to the printer.
Sometimes the ip can change and that will stop the printer from working on the Mac, E.g. mine is set to 192.168.1.100
On the Mac running OS X
1. Open “System Preferences” – “Print & Fax”
2. Click “+” to add a printer
3. Under the IP Tag, Protocol: “Line Printer Daemon – LPD”
4. Address: “IP of the windows machine the printer is shared from”. In my case its 192.168.1.100 (just like that, nothing else)
5. Queue: (is the share name of the printer on the windows machine, in my case its “lh5040”.
Do not leave the queue area blank as the comment tell you, do the above
6. Name the printer what you like, I just left it at the default which is the ip of the printer
7. Print Using: select the printer from the list, on my Snow Leopard sys I used the HL5040 Gutenprint driver
and on my Leopard G5 sys I used the HL5040 Cups as it didn’t have the Gutenprint option.
8. Click the “Add” button
Print away!
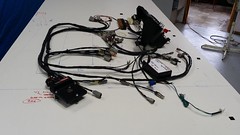
Hi All
Latest Job:
Jaguar XJ12 JX5.3C
Setup and wire up full sequential EFI System.

Car had a M4 Motec running 4 groups of 3 injectors.
The cars wiring had all been replaced with the exception of the engine management loom.
I set it up with a Motec M800 with a 12 cylinder upgrade so it can run 12 injectors sequentially.
I added a sync sensor as the standard setup only runs 1 ref sensor in the distributor.

Made up a box to fit all the electronics, relays, fuses, and ECU.
Made up a fully removable loom to suit.

Loom has prevision for 2 O2 sensors so in the future we can setup closed loop mixture control that can trim each 6 cylinder bank individually.
All went well and car drives nicely.
Photos of the job can be found here : http://www.flickr.com/photos/abletech/sets/72157625278959683/
Hi all.
Welcome to the new look website.
I have changed it to a Word press type site. The reason I have dose this is mainly ease of updating the news (blog) the photos and also some of the content section of the site.
The content on the old site was not to bad to update but the news and photo areas where a pain.
Also the website had a bit of an old look about it.
The new site now also works great on a mobile device, I have tested in on iPhone, iPad and a 7″ tablet.
The Blog area now is on the front page, the place you come to first. I think this is the way of the web now and that is the page that will change the most. (New Content)
That’s why users will come back, to see new content, not much use returning to a site that is always the same.
So have a look around.
Also you will see links on the right to follow me and also links to the Flickr photo gallery, there you will see some cool pics of various nice things I have been working on.
Idd also like to thank Richard Stocks for supplying me with a server for me to setup the site before making it live and all his data base help.
Enjoy
Steven
Tech Tip for those who have a laptop and a PS3
You will need to be tech savvy to do the following, if not it’s something I can do for you.
Do this at your own risk!!!!!! If any of the following is not second nature to you DONT DO IT! Get HELP!
Part 1
If you have a laptop chances are it has a 5400RPM HDD rather then the faster 7200RPM drive.
If you have a PS3 chances are you have less than 80GB HDD installed.
I’ll use my setup here as an example so if you have the same or similar setup this will apply to you.
I have a HP laptop that had a 320GB 5400RPM drive in it.
First, go out and get a 7200 RPM drive, maybe a bigger one as well.
HDD prices are getting cheaper and cheaper so it won’t set you back to much.
First remove existing HDD from the laptop, then make an image using Norton Ghost or Acronis a HDD dock and a desktop PC.
Second, copy over the image to the new HDD.
Then fit the new HDD to the laptop, turn it on and if you did it all right it should boot up as normal. On the first boot windows will say installing new drivers for the new HDD but then will be as always just faster.
Part 2
Make sure your PS3 is all working and software is all up to date.
Go to this site with your PC and download the latest PS3 OS:
Copy the OS over to a USB mem stick, there are instructions on the site on how to do all that and the directory structure to use.
Now using the USB dock you used earlier and a spare HDD (As least as big as the HDD in the PS3) using the PS3 software do a full backup of the PS3 to the HDD in the USB dock. Note the HDD you are going to backup to must be formated to FAT32 (This will take some time)
Some instructions can be found at the following site:
http://au.gamespot.com/features/6176090/index.html
Remove the PS3 HDD and fit the bigger 5400RPM HDD you removed from your laptop.
Power up the PS3 with the USB stick with the OS on it plugged in to the PS3.
Follow the onscreen instructions to get the OS installed and the PS3 back up and running.
With OS installed, connect up the USB dock and the HDD with your backup to the PS3.
Using the PS3 OS, do a full restore from the HDD in the dock. (This will take some time.
With the system restored (it will restart after this) log into your account under network.
Now under account management, activate your system for games and video.
Now I know this sounds weird but deactivate them both and reactivate them both again. (This fixes a bit of a bug I found that stops you’re payed for content from working)
If all went well you should have a faster laptop and a bigger drive in you PS3.
Enjoy.
Went up to the rally on the weekend for a bit of a look. Had to cars that i have tuned running.
Here are the Youtube vids of the rally.
Craig Morris in his EVO 6 (Car 4), Engine tuning and some wiring by me. Video time 0:40
He had a DNF due to a power steering pipe fault. Car hasn’t run that often so will get some teething problems.
Alen Friend in his Nissan Silvia (Car 12) Tuned and fully wired inc Motec PDM by me. Video time 2:30
Car went well, believe he came first 2WD, not sure of the out rite position yet.
Just a short Video of an EVO 6 Rally car taking my wife for a spin around an autocross track after setting up the anti-lag.
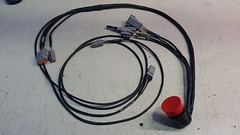
New Fully Removable Loom.
Power System.


EFI Loom & Dash.


Engine Bay.


Final Runs on Dyno – Youtube